Have you seen those adorable mason jar lid pumpkins that have been making rounds on the web for several years? Not only can these festive creations add some fall flair to your home decor, they are an easy and cost-effective way to recycle used canning lids while simultaneously adding to home recycling efforts!
Mason Jar Lid Pumpkins
In this tutorial, I’ll not only show you how to create pumpkins from mason jar lids but will also share various techniques for decorating them as well. These rustic yet charming mason jar lid pumpkins make great fall decorations that’s easy to do yourself!
I collect mason jars for other reasons than canning; rather, I enjoy making luminaries out of them and crafting projects such as these fall mason jars from mason jars – such as these fall mason jars! Something about watching the glow of candles flicker through glass really speaks to my soul! Plus I needed something pretty for summer barbecues, so painted mason jars were the answer!
RELATED: Pumpkin lovers will certainly want to give this 3D paper pumpkin project a try – it’s easy and fun, as well as quite pretty!
*Canning lids and bands can be purchased separately from mason jars, depending on whether or not your wide mouth or regular size requires wide mouth or regular. A box of 12 lids will run you less than $10; those experienced with canning know this already; one lid may only ever need to be used once; whereas, canning jars and bands may be reused multiple times before needing replacement; we suggest making the most out of those with dented bands!
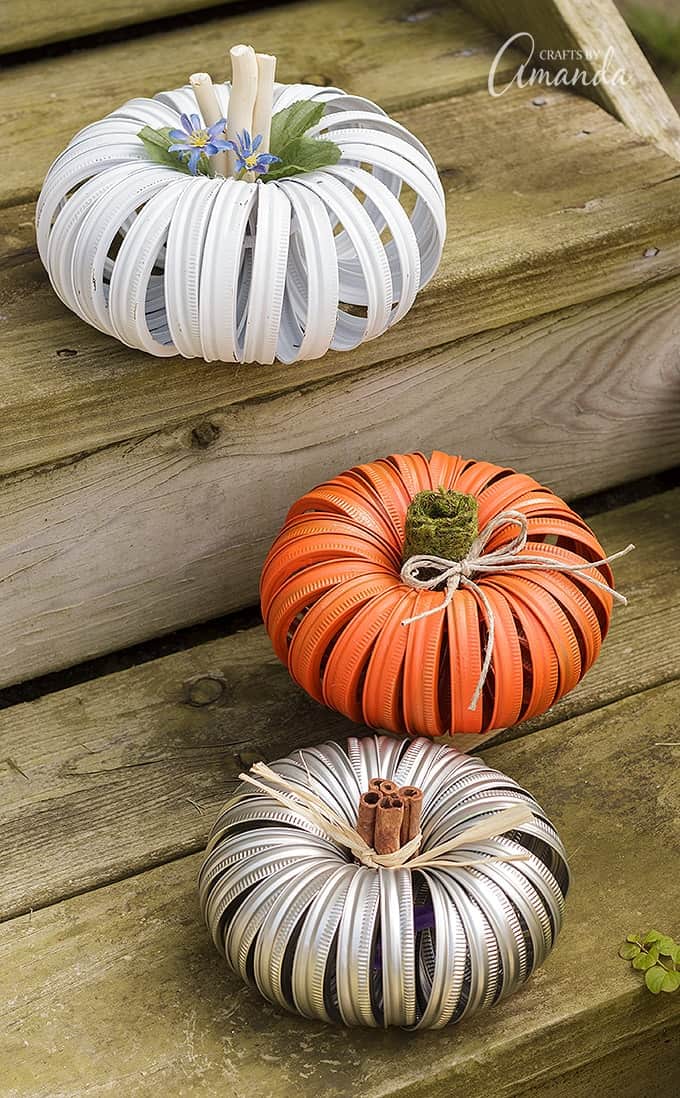
Step one in canning pumpkins requires choosing your canning band size carefully. There are two sizes available – wide mouth and regular. In my photos, both varieties were being used; wide mouth bands are larger, used in my white pumpkin which measures 8-inches long while regular bands fit smaller pumpkins measuring just under 7-inches long.
Next, determine whether or not you would like to paint them. If so, ensure to leave yourself plenty of time for painting both sides as well as drying time – I prefer matte finish spray paint; though gloss finish versions have also been seen on these pieces.
Tip: Your painting doesn’t need to be perfect! Once assembled, simply rotate the bands for any imperfections!
Now it’s time to assemble your mason jar lid pumpkins Most tutorials recommend using string or yarn to secure the bands together, however I found using a pipe cleaner easier as it allowed for tighter connections than yarn could offer. Make sure all bands are running in one direction!
Tip: for smaller pumpkins, one pipe cleaner will do. However, the larger sizes require two.
Start by twisting two pipe cleaners together into one long pipe cleaner. Twist and secure tightly before running it through bands or threading them onto it as desired.
First, twist the two ends of your pipe cleaner together tightly so they interlock, joining all bands. Fan it out if needed but be amazed when your pumpkin magically forms itself when placed on the table!
Finish off your pumpkin by attaching its stem. Hot glue two pairs of cinnamon sticks together, add a dab of hot glue at the base, and insert into the pumpkin center.
Note – in my photos you will notice I used a wine cork wrapped with “moss roll.” Unfortunately I don’t recall where I got it from but did a search online and found something similar here.
Tip: If you want to add raffia, it is easiest to tie it around a bundle before gluing it into your pumpkin.
Ideas for Decorating Mason Jar Lid Pumpkins
Over the past several weeks I’ve come across various designs of canning lid pumpkins. At the end of this post are my top four designs; strips of book pages decorate my personal favorite! Below there are more suggestions of ways you can personalize yours.
Display Your Canning Lid Pumpkin
Displaying Your Canning Lid Pumpkin
It may seem straightforward; simply place it on a table or shelf and you’re done! But why stop there? Consider buying battery operated string lights to put inside your pumpkin for added ambiance! Alternatively, use less bands so there are larger gaps between them when complete; insert some burlap or lace ribbon as embellishment then!